Thursday, February 14, 2013

Creating the right casework

The model is progressing nicely and pretty soon it is going to need something to hold it.  This is where casework comes in.  The casework you see in museums is many times built to house specific objects and artifacts.  Our casework for the model is no different, and we wanted to make it as accessible as possible.


First and foremost, the casework will be the proper height and have the proper reach for visitors who use wheelchairs, for those who have a smaller stature and children according to ADA specifications.  The casework will also be tactile though for our visitors who are blind or have low vision!  The same preparator who has been working on the model, Ian, came up with the idea of having the shape of the Planetarium itself sticking out on the sides of the casework so visitors can experience what the shape of the the building they are standing in feels like, since it has such a unique shape!  


I quickly drew up what this will look like when complete:


A computer rendering of the model is shown sitting on a black box for the case work with a white version of the planetarium raised about an inch out that wraps around the corner.  The shape of the planetarium is a single-sheet hyperboloid which looks like someone took a tube and pulled out the bottom to be very wide and the top to be about half as wide as the bottom with a bottle neck effect about one-third of the way down from the top.  Half of this image is on the front of the box and the other half wraps around the right side.  On top of the casework sits the model which has a 24" diameter base that is grey with the mini Zeiss of an oval ball on stilts in front of eight vertical boxes (all of the Zeiss is a dark teal).  The half dome extends about 20 inches above and is black.  There is a purple wall between the dome and floor which is about two inches high.  Next to this model are the graphics and exhibit text for the model which in this drawing are represented as tan rectangles.  There are three measurements off the casework that show it is 36" tall by 36" wide and 36" inches long.
The Front View

A computer rendering of the model is shown sitting on a black box for the case work from the top down.  On top of the casework sits the model which has a 24" diameter base that is grey with the mini Zeiss of an oval ball on stilts in front of eight vertical boxes (all of the Zeiss is a dark teal).  The half dome extends about 20 inches above and is black.  There is a purple wall between the dome and floor which is about two inches high.  Next to this model are the graphics and exhibit text for the model which in this drawing are represented as tan rectangles.  There are three measurements off the casework that show it is 36" tall by 36" wide and 36" inches long.
The Top View

A computer rendering of the model is shown sitting on a black box for the case work from the bottom down.  The casework is hollow showing the four casters that it is sitting on and the wood on the inside as the inside remains uncovered by paint or laminate.  There are three measurements off the casework that show it is 36" tall by 36" wide and 36" inches long.
Bottom View


It's a brilliant idea and I think it will make a great addition to the whole program!

Sunday, February 10, 2013

Mini Zeiss

The model of the Zeiss and the StarBay have been progressing and it has been very exciting to see the details emerge from raw materials.The model will actually be produced through casting.  To cast, a mold will be made from a positive (kind of like a very polished rough draft of the final product).  When the mold is made, the casting product (plastic, bronze, etc.) can be poured in to create the final product.  This update will take you through creating a lot of the positive that will create the mold in which the final product, our "Mini Zeiss" tactile, will be produced.


A piece of yellow foam that is about 2.5 inches long sits on top of a black and white computer drawing of the Zeiss Universarium IX projector.  The piece of foam has two 1/8" cuts going width wise and then two more cuts going width wise that are about 1/16" wide.  There is also a quarter inch cut going lengthwise.  There is a two-by-four in the foreground as well.
Testing out some material to create the Zeiss Planet Projectors


The practice planet projectors cut from the block of yellow foam that is about 2.5 inches long and one inch wide sits in the middle of a circle drawn with black on a wood work bench.  It looks very small in the circle.  There is a half circle of wood that has the same diameter as the drawn circle of 24" sitting in the drawn circle as well.  There is another half circle mocking up where the walls will go as it sits on silver metal weights.  On another wood table to the left there is a bottle of wood glue, a red clamp and a black clamp.
Practice Foam Planet Projectors sitting in the mock up of the StarBay


Of course trying to get things looking perfect takes a bit of time and a lot of effort! 
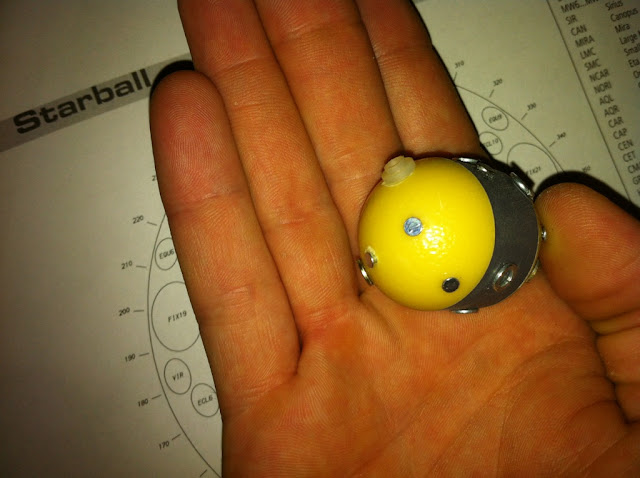
In the background is a white piece of paper with a drawing of a circle that has many other circles all over inside of it.  The page is labeled "Starball" and each of the small circles in the big one is labeled but the font is too small to read.  In the foreground is a hand with it's palm flat and open and resting on it is a small model of the Starball.  It is like a large fat pill or capsule with both ends being yellow and the center being grey.  There are washers and nails all over it to act like small lenses.  The washers and nails are silver metal.
First attempt at creating the starball with accurate lenses


A few different Zeiss positives have been made now until the right size that will be durable enough emerged.
On a grey cart sits many pieces of graph paper and computer drawings of the Zeiss Star Projector in black and white.  The papers cover the top of the cart.  There is also a piece of wood with some wedges of yellow foam sitting on it.  In the foreground is a pencil and three foam versions of the planet projectors.  the smallest is about 1.5 inches long by 1 inch tall with four boxes about .5 inches wide cut into the block.  The medium one has the same shape but is about 2 inches long by 1.5 inches tall.  The biggest is about 3 inches long and 1.5 inches tall.
Different scales of foam planet projectors


Third time's a charm though and now we have the right scale.  Next up was the creation of a Starball that was the right size...
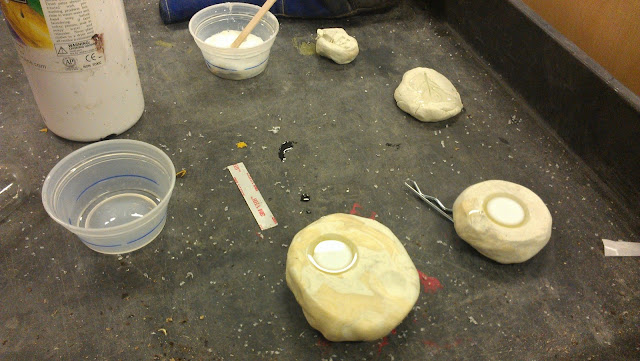
On a grey cart sits two round chunks of clay about the size of an adult's palm and a child's palm.  In each is a dome shaped dent with a diameter of about one inch.  There is a clear plastic starting to solidify from a syrupy liquid the middle of the clear plastic is turning a milky white.  Behind the clay is a white bottle and a couple of small plastic clear cups.
Molding the sides of the Starball

On a black cart sits the round clay mold for the sides of the starball with one dome shaped 1-inch diameter indent.  Two white plastic dome-shapes are sitting on the mold.  there is also a silver metal screw of about one inch, a small metal clamp and another chunk of clay to the right of the main mold.
The sides of the Starball are complete!


A young man in a blue sweatshirt and blue jeans stands in front of a metal table.  On the table is a lathe; it is silver metal and has a large black and yellow caution sign on the side.  It is about a foot tall and 2.5 feet long and one foot wide.  There are a few cranks on the side that the young man is using to control the metal arm with a sharp point that goes back and forth to cut the grey plastic piece that will be the middle of the starball.
Creating the center of the Starball on the lathe

A silver and blue drill press is being used in this picture.  The press stands about 6.5 feet tall and has a large box at the top for the motor.  it is attached at the back to a silver metal pole wit ha diameter of about six inches and has a counter at about four feet.  On top of the counter sits a black box and a piece of yellow foam.  A red bit is being pressed into the foam.  It is connected to a silver metal pole attached to the large box at the top of the machine.  A hand is using the crank to lower the bit into the foam.  Below the machine is a white box with pieces of wood in it.
Making the base for the Starball on the drill press


We want it to be as accurate as possible, so checking it against the real thing now and then never hurts!
In the Planetarium under the large white dome sits the teal colored Zeiss Universarium IX Star Projector.  It is about 15 feet tall, 15 feet long and 10 feet wide.  The starball looks like a giant slightly elongated ball (so that it is not a perfect sphere) and on it are many smaller circles that are lenses.  These lenses cover the entire ball.  It is perched on four legs that hold it to a rotating circular base that sits upon two black wedges.  On a third black wedge that extends in front of the ball are the four planet projectors.  Each one is about 4 feet tall and two feet wide.  The whole thing is enclosed by a blue metal fence.  On a chair in the foreground is the yellow foam and white plastic positive of the Zeiss.  It is about six inches long total, two inches wide and ten inches tall, but it mimics the real projector almost exactly in a smaller scale.
The Mini Zeiss positive meets the real Zeiss


In the open fingers of a left hand sits the Starball positive for the Mini-Zeiss Model.  It has many small washers and nail heads attached to it now to mimic the lenses of the real Zeiss.  It has also been painted with Hammerite which gives it a metallic silver appearance.  It is about 1.5 inches long and 1 inch in diameter.
The Mini Zeiss's Starball positive gets some lenses and a coat of Hammerite

Once again I'd like to give a special thank you to Ian for all his hard work.  When I first thought of this model, I had no idea how much time and effort would be involved but he has truly brought the small version of the Zeiss to life and it's not even finished yet!